

How To Clean Hayward Sand Pool Filter
You should upgrade or employ an alternative browser.
- Status
- Not open for further replies.
- Add bookmark
- #one
This postal service is intended to provide a more than in-depth wait at how the filter works. This post is NOT a substitute for understanding how to perform the bones functions of your filter in the daily operation of your pool. Please see the Pool Schoolhouse article for that data.
Many new members with sand filters enquire the question, "When should I modify my sand?" The short answer is, usually never. Sand existed for millions of years before it concluded up in your filter. A few years of working on your pool won't change it. While there are some rare circumstances where sand may need to be changed, in general a deep cleaning tin can practise wonders for your filter's efficiency.
Anatomy of a Filter
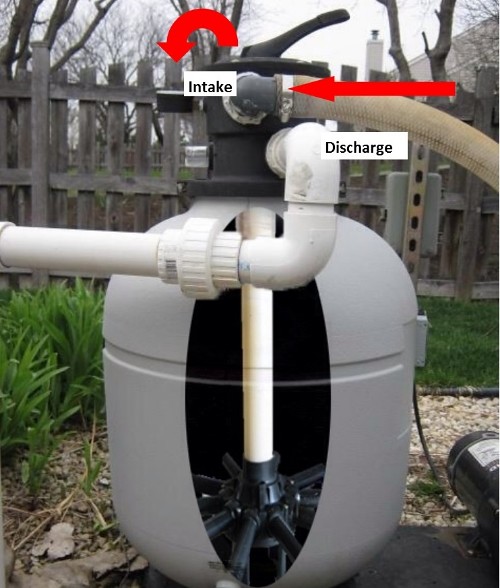
Hayward S180T sand filter
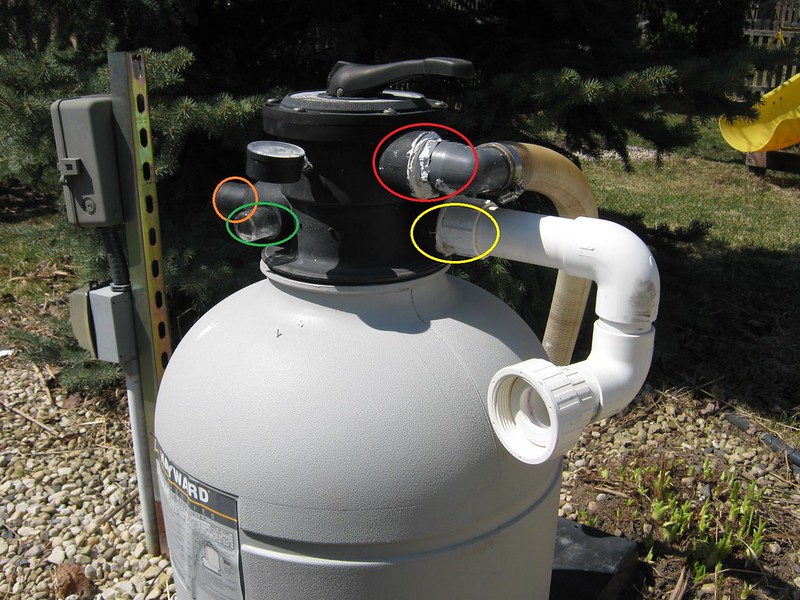
This is a pic of the filter. The Red circle is the "Intake" from the pump. The xanthous circle is the "discharge" to the render. The orange circle is the waste port and the green circle is the sight drinking glass.
Not pictured is the band collar that secures the multiport to the filter body.
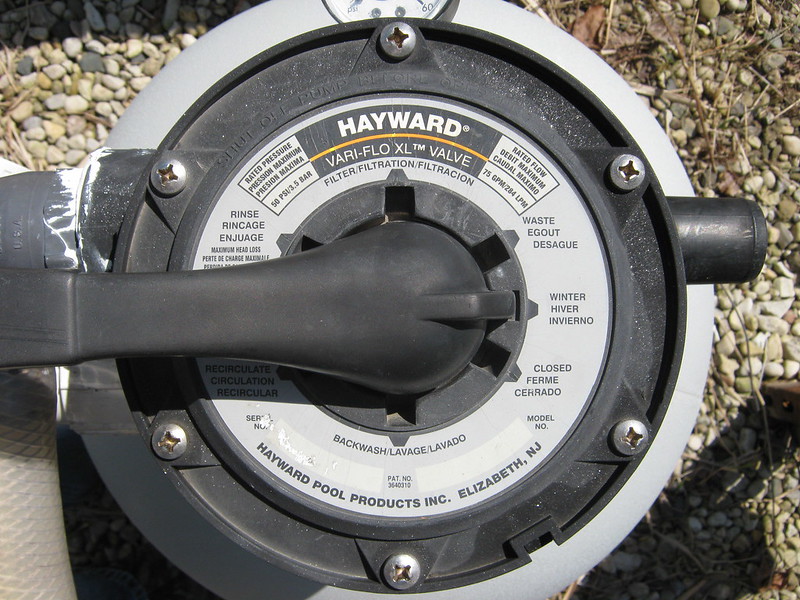
This is the top view of the multiport with all of the settings. These half dozen screws will disassemble the multiport, not split up the multiport from the filter trunk. Disassembly is necessary only to get to the spider gasket (where serviceable). To disassemble, remove all half-dozen phillips head screws. This will reveal the key, encompass, and handle assembly, besides as the spider gasket. The spider gasket on this particular multiport is not a serviceable item.
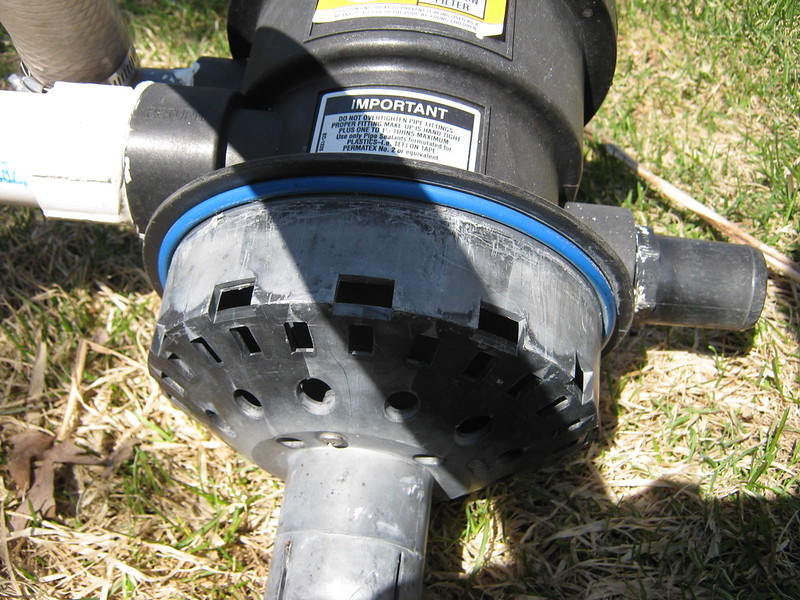
This is the multiport, removed from the filter, as viewed from the bottom. Small leaks from under the band neckband are normally explained by the bluish o-ring not existence seated properly or being damaged (if tightening the band collar doesn't fix the leak). The bottom of the multiport will be seated on the standpipe in the adjacent picture.

This is a bird's centre view of the filter with the multiport removed. The pipe in the middle is the standpipe. Notice the thin layer of debris on top of the sand bed. As yous will see later in the video, this layer will exist removed, followed past a deep clean of the sand bed, before reassembling the filter.
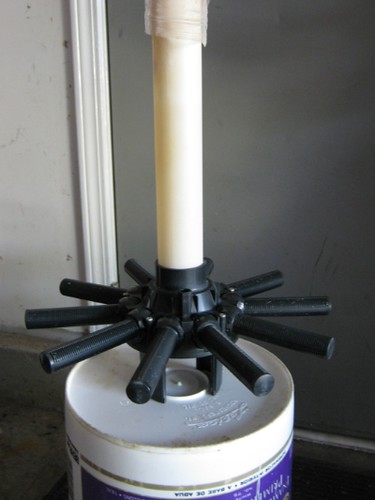
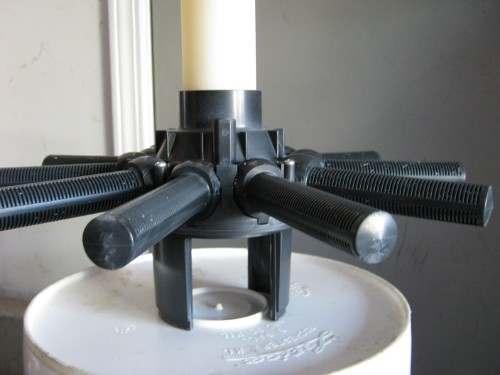
This is the lateral assembly removed from the filter. Every bit seen in the 2nd photo, the openings in the lateral fingers are each just thinner than a grain of sand. Always use extreme circumspection when working with the laterals to forestall damage. On this model, the laterals themselves do not spiral in to the standpipe. The screws at the base of operations of the associates must exist removed and the base separated to access each lateral. Other styles have each lateral finger threaded then that it can spiral into the base of operations of the assembly.
Sand Filtration 101
So how exactly does the water get clean? Think those settings on the peak of the multiport? Let's walk through them. Carmine arrows represent unfiltered water from the pool. Bluish arrows represent clean filtered water. Light-green arrows represent dirty water.
Warning - When you plow the handle, the water is diverted in different directions based on the settings chosen. All changes must be fabricated with the pump off! Put another fashion, never plough the multiport handle while the pump is running.
Special thank you goes to Leebo for virtually cut open up then rebuilding my filter so you lot all can see the inside.
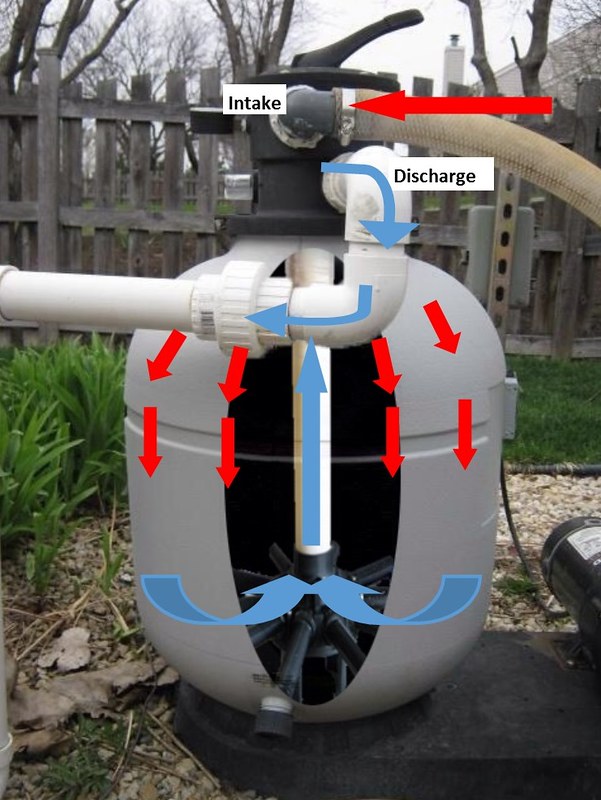
FILTER - Filter is normal operation. On this setting, pool water enters the intake and is sprayed on top of the sand bed. It travels through the sand bed under pressure, where the sand filters out particulates. This at present make clean water enters the laterals at the bottom of the filter, travels up the standpipe to the multiport, and out the discharge where it returns to the pool.
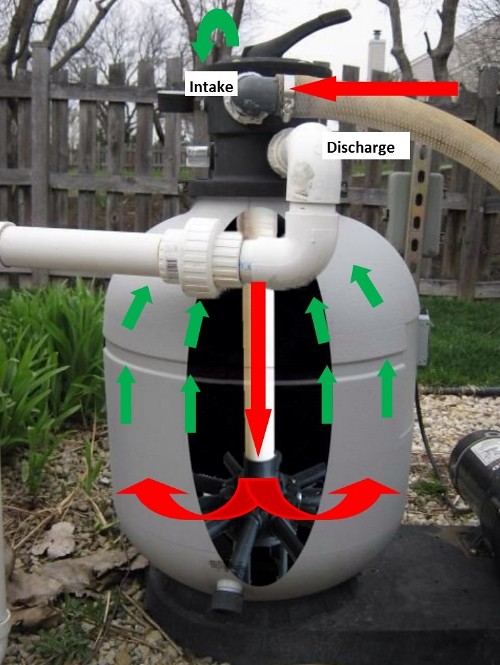
BACKWASH - As your filter cleans your pool, it becomes clogged with all of the particulate thing that was in the pool. Filter pressure will increase while menstruation decreases. Backwashing is necessary to clear out that sand and return the filter to normal period. TFP recommends backwashing when filter force per unit area rises 20-25% above the clean pressure level functioning. In backwash fashion, the flow is reversed from normal filter operation. Unfiltered pool h2o enters the intake and is directed down the standpipe, out the laterals and upwardly through the sand bed. This activeness dislodges all of the clay and particulate thing that has been trapped in the sand. This dirty water is sent out the waste material port on the dorsum of the multiport. Backwashing not only "washes" the sand, but also leads to resettling it in the adjacent step, which is....

RINSE - ....rinsing. Rinse is exactly the aforementioned as filter, except the filtered water is sent out the waste product line instead of dorsum into the pool. This step should always happen after backwashing for two reasons. First, whatever clay and debris in the filter that did not go ejected during the backwash is at present in suspension with the sand. Firsthand filtering could put some of it in the pool. Second, the rinse helps resettle the sand bed for when the organization is placed back in filter mode.
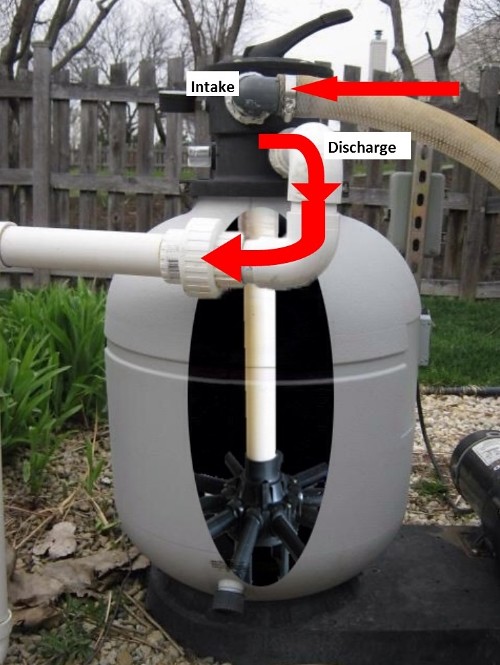
RECIRCULATE - This fashion bypasses the filter completely, every bit if it was removed from the plumbing loop. Unfiltered pool water enters the intake, skips the sand, and immediately goes out the discharge and back to the pool. The near applied use of this setting is during the early stages of a SLAM overnight, where mixing of the pool water is desired, simply filtration would reduce catamenia too speedily.
Waste material - In this way, unfiltered puddle h2o bypasses filtration and is ejected out the waste product port. The nigh mutual uses for this mode would exist "vacuuming to waste," or for draining the pool.
The final settings on this multiport (and pictures don't really help) are as follows:
WINTER - The multiport is intentionally placed between two settings, completely opening up the passageways. This setting is used while the filter is empty over winter.
CLOSED - This turns the filter into a giant ball valve, cutting off and blocking h2o menses betwixt intake and discharge.
The Ultimate Deep Clean
Backwashing is a maintenance action that should exist taken during the swim season (or the SLAM process) when flow slows downwardly and force per unit area rises. Sometimes a backwash just isn't good plenty. This is when a deep clean is required.
The deep cleaning should be washed once a year at the showtime of your season to ensure the sand bed is settled properly. It will also assistance dislodge the droppings from underneath the laterals at the very bottom of the filter. Finally, it is possible that filters get then dirty, packed and clumped together, small channels form in the sand. Water tin can have this route instead of through the sand, greatly reducing the cleaning power of the filter.
Waterbear gave us the following instructions from this mail service:
Open up up the filter and then the sand bed is exposed. Stick a garden hose into the sand and turn on the h2o. The sand should loosen upwardly and all the dirt and gunk should float and overflow out of the filter. You might demand to stir up the sand a bit. Keep this up until the water overflowing out of the filter is clean. If any sand is clumped together Carefully break it up with something like a broom handle but Exist VERY CAREFUL Non TO Damage THE LATERALS. Yous will be surprised at how much stuff this gets out of your filter than backwashing doesn't and I experience this 'deep cleaning' should be washed yearly. This should take care of the channeling but if the sand has a lot of calcium deposits you might desire to follow this up with an acidic sand filter cleaner from the pool store.
** Alert -- Earlier starting this procedure, be sure that the filter is isolated from the pool plumbing. I filmed this video at the very beginning of the swim season, and my plumbing was not hooked up nonetheless. If the filter is all the same connected, turn off valves, disconnect plumbing, or do whatever you demand to exercise to isolate your filter from the arrangement. If you don't exercise this step, as you fill up the filter with h2o, the junk and grime will fall into the standpipe and go right dorsum into your puddle.**
The following videos prove the deep cleaning.....
https://youtu.be/MpNEBIIR5P4
https://youtu.exist/1wBhwYv_RKI
- Add together bookmark
- #ii
- Add together bookmark
- #4
- Add together bookmark
- #5
I cleaned mine out today and information technology was and so grouse what came out. I had what appears to be lumps of decayed cloth/poop sitting on the top and I had back filled/cleaned the media already for 10 minutes earlier my pump gave out. And so, I definitely appreciate the guidance on deep cleaning.
1. Are in that location issues if no sand comes out of the bottom of the drain port? I filled it three times and discharged, while I was cleaning, and still no sand.
2. Is there a general distance/height that should exist betwixt the sand bed and the collar? My filter had virtually 12" of empty infinite between the neckband and the sand bed and while I saw/lost a lot of sand, in the past two years, in/on the pool flooring I also vacuumed it dorsum up.
3. If you still see "junk" after thirty minutes, of constantly excavation/cleaning in should you continue or consider replacement? I used to continue table salt water aquariums and at that place are times where the sand is really gone and you are meliorate off throwing it abroad and starting over.
4. Do you recommend bleaching/cleaning the sand with 1 of those cleaner(s).
5. I noticed a lot of bubbling forming fifty-fifty after 30 minutes of churning the sand, and the hose never reached the top/left the water, so is it off-white to assume that nosotros should continue cleaning/digging into the sand until no micro-bubbles are nowadays?
6. Going back to the salt water aquarium, filters tend to build up (good) bacteria that helps with breaking downwards organics. So, I would think that if you did it outside of a SLAM (or high chlorine scenario) information technology could have a negative bear upon on the chemistry of the pool and we should more aggressively monitor our water chemistry?
I promise this helps other users and I appreciate any insight.
Thanks in advance!
Ben
- Add bookmark
- #half dozen
2) It varies from filter to filter. Often the right height is mentioned in the manual.
iii) No, just rinse longer.
4) No, water when rinsing and chlorine when in normal use is sufficient. There is a very rare exception when the filter sand is all a sticky gunky mess (virtually never happens).
5) Bubbles aren't a good indicator.
six) Nothing lives in a pool filter, so there is nothing like this with a pool filter.
- Add bookmark
- #vii
- May 22, 2013
- 2,770
- Cape Coral, FL
- Pool Size
- 12000
- Surface
- Plaster
- Chlorine
- Salt Water Generator
- SWG Blazon
- Hayward Aqua Rite (T-fifteen)
- Add bookmark
- #10
Is there a way to overflow the filter without pouring h2o all over the place? My filter is in a puddle shed with wooden floors (and questionable electric that I even so demand to sort out). I don't feel safe overflowing the filter onto the floor.
If you lot had a fashion to shut the hose off you could employ a moisture vac to suck the stuff up but you'd need to exist able to shut off the h2o between emptying the vac.
- Add bookmark
- #11
- Add bookmark
- #13
- May 22, 2013
- 2,770
- Cape Coral, FL
- Pool Size
- 12000
- Surface
- Plaster
- Chlorine
- Salt Water Generator
- SWG Type
- Hayward Aqua Rite (T-15)
- Add bookmark
- #14
Is there a fashion to overflow the filter without pouring water all over the place? My filter is in a pool shed with wooden floors (and questionable electrical that I nonetheless demand to sort out). I don't feel safety flood the filter onto the floor.
I know this was a month ago only I ran across someone who had a like trouble of not wanting all that stuff where the filter is and idea to use a small pond pump at the top to pump the water away from the filter.
Seemed like a skilful idea and much easier than trying a shop vac.
- Add bookmark
- #15
Found a place between the pump and filter that had stuff. But got one-half of it out, but can try again some other time to remove information technology all.
Cheers for posting this tutorial, it fabricated it seem less intimidating!
- Add bookmark
- #16
- Add bookmark
- #17
- May 22, 2013
- 2,770
- Greatcoat Coral, FL
- Puddle Size
- 12000
- Surface
- Plaster
- Chlorine
- Salt H2o Generator
- SWG Type
- Hayward Aqua Rite (T-fifteen)
- Add bookmark
- #18
- Add bookmark
- #xix
- Add bookmark
- #twenty
- Status
- Not open up for further replies.
Similar threads
- Welcome to TFP! For a wealth of pool care information please check out our costless Pool School. If yous are in demand of specific help then we encourage you to Register and ask us here in the forum!

How To Clean Hayward Sand Pool Filter,
Source: https://www.troublefreepool.com/threads/deep-cleaning-a-sand-filter.73192/
Posted by: stewartadvigul.blogspot.com
0 Response to "How To Clean Hayward Sand Pool Filter"
Post a Comment